LIVING SOIL GARLIC FARM
Nurturing the Soil, Harvesting the Flavor







Welcome, fellow garlic lover!
At Living Soil Garlic Farm, our mission is to grow garlic using Regenerative Agricultural practices. Our small farm is dedicated to nurturing the soil, promoting biodiversity, and producing high-quality garlic that is full of flavor and nutrition. Click on the links below to discover more!
Garlic 101
Terminology


Health benefits
Garlic origin
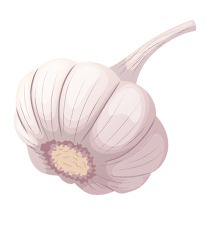

basal root plate -->
spathe -->
beak -->
<-- scape
<-- stem and leaves
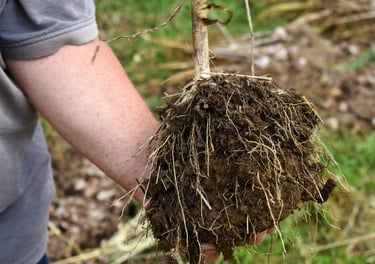
roots -->
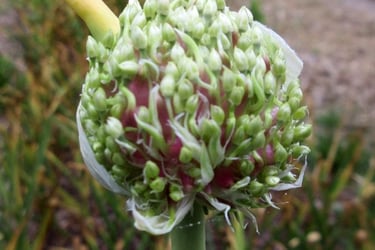


spathe beginning to open, exposing bulbils and flowers
bulbils
allium - the Genus of plants that includes onions, shallots, leeks, chives, and garlic
horticultural groups - ten groups which organize garlic varieties with similar characteristics
varieties - individual types of garlic with unique characteristics
hardneck - varieties that grow a woody flower stem topped by a scape
softneck - varieties that usually do not have a hard flower stalk and can be braided
green garlic - immature garlic that has been harvested before the cloves differentiate, and can be eaten like a scallion
black garlic - garlic that has been slowly roasted in the wrapper (skin) for several weeks to produce a soft texture and sweet flavor
It may surprise you to learn that, just like apples, not all garlic is the same. Depending on the source you read, there are at least 200 varieties, and perhaps many more. On our farm we have experimented with 55 different varieties, and are currently concentrating on 6 that have been successful for us. Elephant garlic, while impressive due to its size, is not garlic...it is actually a mild-tasting type of leek. Botanically, elephant garlic is a corm, not a bulb.
For thousands of years, garlic has been consumed for the many potential health benefits it may provide. We cannot prove or disprove the accuracy of these claims, but we would encourage you to do further research on your own if you are so inclined. Till then, just eat MORE garlic!
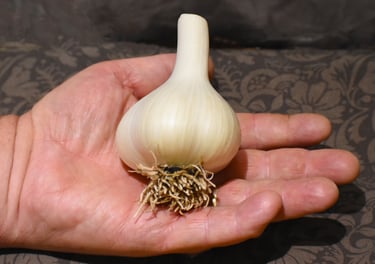
<-- bulb or head -->
Garlic has been eaten and cultivated for thousands of years. It is now grown all over the world and enjoyed in most cultures. It is believed that garlic originated in Central Asia and spread throughout the ancient world by traders using the Silk Road.
Hardneck & softneck facts
Neither type produces true seeds as formed from the pollination of flowers.
Hardnecks have scapes which contain flowers and bulbils. The bulbils are not seeds, but can be planted in a manner similar to cloves.
Softnecks usually don't produce scapes or flowers.
Hardnecks generally grow better in the Northern US, and softnecks in the Southern US.
If you desire to grow a hardneck in the South, you should provide a chill period by refrigerating your bulbs below 40 degrees for at least a month before planting, or they will not grow bulbs.
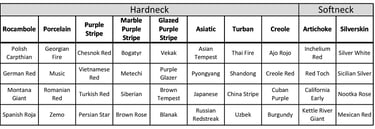
Horticultural groups
This is just a few representative samples of varieties in each group.
Varieties

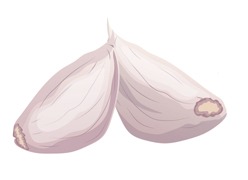
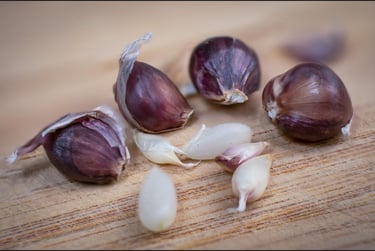
cloves
What is Regenerative Agriculture?
Higher nutrient density of the foods grown - Recent research suggests that the nutrient content of our food is substantially lower than it was 50 years ago. We are now beginning to understand how the organisms living in the soil supply those nutrients to the plants and enhance their nutritional value for us. It makes sense to do everything we can to promote this natural symbiotic process.
Benefits to public health as a result of the higher nutrition - Everyone is aware of the rapid rise of chronic diseases in recent years. Ongoing research is starting to show a connection between many chronic diseases and the lower nutritional value of our food. Logically, it follows that growing our food by methods that enhance the nutritional value could help counteract this unhealthy trend.
Financial benefits to the farmers and their communities - Many growers who have embraced the above practices have lowered their input costs while maintaining adequate, or even enhanced, yields. As a result of this, the profitability of their farm increased. This not only improves the lives of the farm family but returns more money back to their local community so everyone benefits.
Organic vs. Regen Ag
There is not a simple, concise definition of Regenerative Agriculture. Instead, there is a list of generally agreed-upon principles and practices which describe the approach.
Understand context - Your approach and methods will vary depending on many factors, including crop grown, acreage, available equipment, knowledge and experience of the grower, financial status, and more.
Minimize soil disturbance - The foundation of growing healthy plants and nutritious food is to enhance and promote the soil biology to the greatest degree possible. Soil biology includes beneficial bacteria, fungi, protozoa, earthworms, etc. Tillage is harmful to these organisms, so it is very beneficial to reduce or eliminate it.
Keep the soil covered - Bare soil dries out rapidly, cooks in the summer heat, freezes in the winter, gets pounded by raindrops which compact the surface and seal it so water cannot infiltrate. Such a harsh and unstable environment is not conducive to promoting soil biology. Covering the soil year-round with cover crops or mulch moderates soil conditions and protects it from damage. These coverings are referred to as "armor". Note that bare soil will grow a bountiful crop of weeds in a very short amount of time. This is nature telling you that it wants the soil to be covered. If you do not cover the soil, nature will, and you may not like the choice of plants used. Conversely, if you do cover the soil, you will reduce weed pressure, and can reduce or eliminate herbicide use.
Maintain living roots year-round - Traditionally, cover crops were called "green manure," reflecting the value and benefits that they provided. Science has come a long way in recent years, and we recognize to an even greater degree the benefits of growing cover crops. Cover crops are "solar panels" harvesting sunlight and converting it into food in the form of sugars. Plants send at least 25% of that food into the soil as root exudates which feed the soil biology. The soil biology, in turn, prepares and gathers nutrients from the soil and delivers them to the plant. Just like any other living thing, the organisms living in the soil need to eat every day. Therefore, it is important to have living roots supplying them with food for as much of the year as possible. Ideally, the living roots would be there every day. We are only beginning to understand this natural age-old and very complex symbiotic relationship.
Maximize crop diversity - Traditional farmers appreciated the value and benefits of rotating their crops from year to year. We now have a much greater understanding of the importance of diversifying the crops grown. This refers to not only the cash crops, but also the cover crops. Progressive farmers leading the Regenerative Agriculture movement have been experimenting with many mixes of cover crop species and are seeing excellent results.
Integrate livestock - Historically, abundant wildlife, particularly herbivores, roamed freely, eating and trampling vegetation and dropping manure as they went. Modern rotational grazing practices replicate this process. The soil improves rapidly and dramatically as the plants and soil biology thrive.
In the opinion of many growers, organic and Regenerative Agriculture practices both offer advantages over conventional growing methods. However, there are significant differences between the two of them. For example, organic farming and gardening usually involve a lot of tillage. Organic practices do not necessarily use cover crops and may not attempt to have living roots in the soil year-round. In some contexts, organic practices may involve extensive use of compost. Compost is a wonderful and powerful soil amendment. I (Dave) have been making and using compost for over 50 years, and still use it extensively. However, it is, in effect, making use of "old sunlight" to enhance the soil. Regenerative Agriculture practices use the "solar panels" of crops and cover crops to harvest "new sunlight". Furthermore, the root exudates from the living plants provide many benefits for the soil biology that compost cannot.
A farm implementing Regenerative Agriculture practices may or may not meet official organic standards. However, if they do follow organic standards, the combination surpasses the environmental benefits of organic alone.
Other principles espoused by some leaders of the Regenerative Agriculture movement include:
How we apply the principles

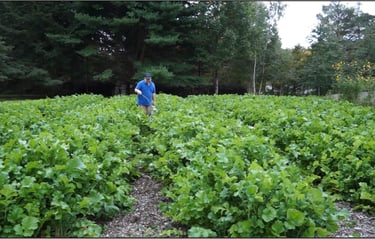

Ideally we would grow a mix of several species at the same time. We are still working on this. We use radishes as the final cover crop before the garlic is planted in the fall. Other cover crops we have used throughout the year for bed rotations include oats, fava beans, buckwheat, cowpeas, sunn hemp, sorghum Sudan grass, winter wheat, and rye. Greater diversity of crops and cover crops results in greater diversity of soil biology, too. In this photo I was applying liquid fish fertilizer to the radishes as a foliar feed. Be aware that deer don't eat garlic, but they will destroy most cover crops. You must be prepared to protect them with fencing, and there are numerous options for doing this successfully.
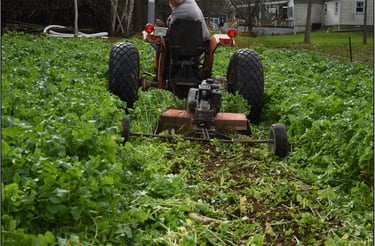

We use shallow tillage to shred the cover crops and incorporate them into the soil before the bed will be planted. Here the forage radishes are being tilled in about 1 to 1-1/2 inches deep in preparation for planting garlic. They are similar to diakon radishes sold in the grocery stores., The tractor and DR pull behind tiller both had the axles lengthened so the wheels are on the paths, not the 42-inch-wide beds. We also lengthened the axles on all of our other equipment, including the trailer, wagon, and leaf vacuum. Furthermore, we never step on the beds, so soil compaction is essentially eliminated.
Understand context
Minimize soil disturbance
Maximize crop diversity
Keep the soil covered
Maintain living roots year-round
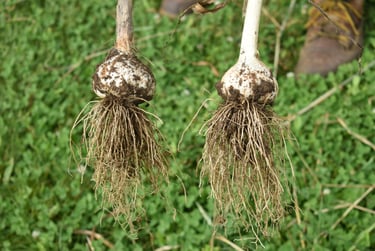
Garlic provides living roots to feed the soil biology, even during the winter months. In beds being rotated through the winter with cover crops we use winter wheat or rye for living roots. Living roots are important because they carry photosynthates from the "solar panels" down to feed the soil biology. In turn, the soil biology feeds your crops. Furthermore, the plants feeding the soil biology is the key to building (rebuilding) soil carbon and Soil Organic Matter. There are many benefits to increasing carbon levels in the soil, not the least of which is that you are removing it from the atmosphere. This natural system can't be beat for low-input sustainable gardening and farming.

Integrate livestock
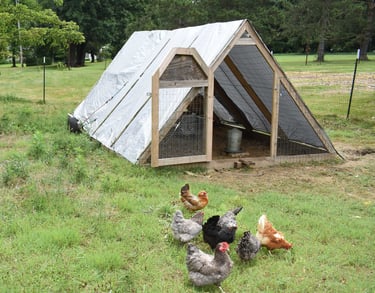

Including livestock is a very important step to improving soil health. Our options are limited for various reasons, but we currently have chickens. We don't allow them to free range, and they are never in the garlic beds. Instead, they live in a mobile "tractor" and are enclosed in a fence. We move the tractor and fence every so often. This lets us control the areas we want turned over and fertilized with their manure, and protects them from predators. When we clean out the tractor, we remove the straw bedding and throw it in a compost heap, which will eventually be incorporated into our vegetable beds.
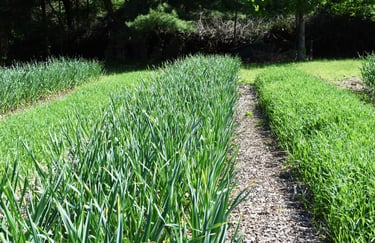

This is crucial to success! A farm that grows garlic is going to have different methods and expectations than one that grows corn and soybeans. Scaling up from a large garden using compost to managing a half-acre garlic patch using cover crops and minimum tillage was a steep learning curve. On the other hand, it has also been challenging to scale down cutting edge regenerative practices developed by farmers working with hundreds or even thousands of acres. The hardest thing of all was mentally getting past the need for tillage! The journey has been very rewarding, and we are still figuring things out. One example of an adaptation for our small farm: We need to sow seeds for a variety of cover crops and we only want seeds in the beds, not in the pathways. However, we don't have a drill. How can we get even and proper distribution of the seeds? Many of the cover crop seeds are similar in size to pelletized lime. We mix the proper amount of seed with the lime and apply it with a simple drop spreader, This low-tech approach works very well.
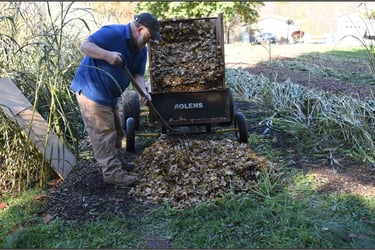
We spread shredded leaves about 6 to 8 inches deep for mulch after planting the garlic. The mulch provides "armor" to cover and protect the soil, as well as creating an ideal habitat for the soil biology to live year-round. This includes bacteria, fungi, protozoa, earthworms, and who knows what else. Since we depend on the soil biology to feed our garlic plants, it's the least we can do for them! In the beds that are "fallow" for the year, including winter months, we plant a sequence of various cover crops and they serve as armor on the soil. Never allow your soil to be uncovered.
At Living Soil Garlic Farm, we made the decision in 2020 to embrace the Regenerative Agriculture approach. We have gardened using an organic approach for decades. However, focusing on life and new sunlight (cover crops and soil biology) instead of old sunlight (compost) is challenging. We are very satisfied with the results so far and intend to continue in this direction, learning as we go. Although not certified organic, we do follow organic practices. No chemical fertilizers or pesticides are used in our garden or garlic patch---ever. There is a new Regenerative Organic Certification which we intend to look into. We may or may not pursue that in the future.
We spread shredded leaves about 6 to 8 inches deep for mulch after planting the garlic. The mulch provides "armor" to cover and protect the soil, as well as creating an ideal habitat for the soil biology to live year-round. This includes bacteria, fungi, protozoa, earthworms, and who knows what else. Since we depend on the soil biology to feed our garlic plants, it's the least we can do for them! In the beds that are "fallow" for the year, including winter months, we plant a sequence of various cover crops and they serve as armor on the soil. Never allow your soil to be uncovered.
Varieties we grow
Rocamboles
German Red
Porcelains
Georgian Crystal
German White (extra hardy)
Georgian Fire
Hot Yugoslavian
Asiatic
Asian Tempest
A basic growing guide
Prepping the soil
Mulching
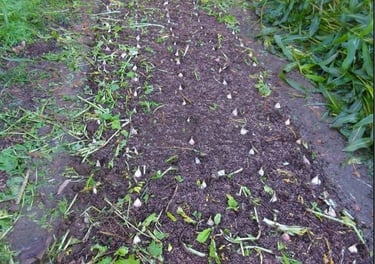
Planting the cloves
Spring maintenance
Think carefully about where you will plant. Garlic requires full sun and well-drained soil. Garlic is a tough plant that will grow in spite of what you do to it, but it will not tolerate wet soil. In order to harvest large bulbs, a lot of TLC is required. Start with a soil test through your county extension office. This should be done during the summer or fall months. Plan ahead to add any necessary amendments, and do soil preparation before planting time at the end of October or early November. If the area where you will be planting is currently in grass, you should take steps well in advance to kill the sod. Ideally, you would not disturb the soil, but cover it with clean cardboard and a heavy mulch of grass clippings several months in advance. The grass will die, the roots decay, and the soil will become loose and ready to plant. Raised beds filled with compost or good-quality topsoil are always a benefit to your crops, and are a great option with garlic. This is especially true if you will be planting in an area where the soil is not well drained and/or has been heavily compacted by foot or vehicle traffic. If lime is required to raise the pH or the calcium level of the soil, use pelletized lime for faster results. Pulverized agricultural lime also works, but takes longer to deliver results. It is always a benefit to your garden to incorporate well-rotted compost or composted manure. Before planting we add a pelletized organic fertilizer. The pelletized organic fertilizer releases the nutrients slowly as the soil biology consumes and digests it. If more nitrogen is needed during the spring months, we use a foliar spray of liquid fish fertilizer.
In Northwestern Pennsylvania, late October to early November is prime planting time. You should research the best time for your area. We used to plant in mid-October, but now find the growing season is several weeks longer than it used to be. If we plant in mid-October, the plants easily achieve 6 or 8 inches of growth above the mulch and freeze back during winter. This wastes a lot of energy and reduces energy reserves in the clove for the plant to regrow in the spring. For this reason, we now wait till the first week of November in our location. Before planting, pop the cloves from the bulbs. Do not remove the wrapper (skin) or damage the cloves. It is especially important to not damage the root plate, the flat end of each clove. Select the largest cloves from the largest bulbs for planting, because they have the greatest potential to grow a large bulb next year. Save the remaining cloves for consumption. If you have a lot of extra cloves and are concerned about how long they will keep, see the "storage" section. Some of the hardneck varieties will not maintain their freshness and quality longer than a few months.
We have experimented with many different recommended spacing arrangements over the years, and have found that most of these work just fine. We would suggest a balance between giving the plant enough room to grow, but not wasting space in your garden. For years we planted garlic in rows 12 inches apart, with 7 inches between cloves in the row. We realized that this worked, but was wasting space. We now plant with 5 inches between cloves in each row, and there is still sufficient space and sunlight penetration for each plant. Choose a spacing arrangement that achieves the best balance for you. Always place the clove with the pointy end up and the flat end down. Most growers recommend you plant the cloves about 2 inches deep. If you do not mulch heavily after planting, you should follow this recommendation. We mulch 6-8 inches deep with shredded leaves, and set the top of the cloves level with the top of the soil. We have found this works very well. However, if you do not mulch, you need to put the clove deeper in the soil to prevent the clove being damaged during the colder months. We strongly recommend mulch.
There are many benefits to using mulch in your entire garden, and especially in your garlic patch. As mentioned, we use shredded leaves on our garlic. When we plant in the first week of November, the cloves will start growing immediately after planting. The sprouts usually stay down in the mulch all winter, protected from freezing and the tops dying back. Freezing would not kill the plant but does waste the energy spent growing those leaves. Our biologically active soil generates some heat and is insulated by the mulch. Therefore, our soil never freezes during the winter, even without snow cover. That allows the roots to grow slowly all winter. The cloves are firmly rooted within a few weeks of planting, and they often have roots 6 inches long by March. When warmer weather arrives and the sun gets higher in the sky in mid-March, the plants pop through the mulch and take off with rapid growth. The benefits of this protection and growth during the winter are hard to overstate. In addition, the mulch prevents soil compaction from falling rain drops, cools the soil in the hot summer months, holds moisture, suppresses weed growth so weeding is seldom if ever necessary, and supplies a variety of micronutrients to the soil. All in all, it creates ideal conditions for the soil biology and garlic to live and thrive. That is our goal. We have experimented with straw mulch applied about 4 or 5 inches thick. We found it is "ok", but we strongly prefer shredded leaves. The straw contained seeds from the grain crop which germinated and became a major weed problem. The straw is also inferior to leaves for winter protection and moisture-holding abilities in the hot summer months. Depending on where you live, you may have other options for organic mulching material. Whatever it is, we strongly encourage you to use it and apply it in appropriate, but generous, amounts. We have never experimented with plastic "mulching" materials. We don't like the idea of using them, and plastic obviously cannot provide the benefits of a good organic mulch like shredded leaves.
On our farm the excitement begins in mid-March when the days get longer and the sun gets higher in the sky. The little garlic plants pop up through the mulch and grow aggressively. We will have lots of frost and snow in the next two months, usually till mid-May, but garlic laughs at the cold. We walk the garlic patch regularly, enjoying the vigorous growth of the plants. Around mid-April we begin applying liquid fish fertilizer as a foliar spray. The frequency of this varies according to how much time we have and the weather conditions, but we apply it about every other week. It supplies a nice shot of nitrogen, and the plants respond with dark green leaves and vigorous growth. We usually continue the fish fertilizer applications until around early June, and then let the soil biology carry the load. We are always watching for insect and disease issues, but have never seen any. If we get a dry spring or summer, we irrigate as needed. Weeds are seldom an issue, but if any do manage to get through the mulch we pull them. Garlic does not like competition, and bulb size will suffer if weeds are not controlled.
Scapes
Around mid-June the hardneck varieties will start growing scapes. The developing flower heads can be very pretty. However, you must remove them because allowing them to grow will reduce the size of the bulbs. Growers differ in their recommendations on the best time to remove them. This can be a guessing game at first. As the scapes grow, they will begin to curl (see photo), and then gradually straighten out once again. You should be observing the garlic daily at this point so you can remove the scapes before they begin straightening. Allowing them to develop requires a lot of energy which the plant could be putting into the bulb. Some people remove the scapes while they are small in order to consume them. If you choose to eat them, you must remove them before they become hard and woody.
If you grow hardneck varieties, they will grow a scape in the weeks before harvest. The scape contains bulbils, which are sort of like miniature cloves. You can plant these and they will grow. However, they will grow a very small bulb. In many cases, it will resemble a scallion and will not differentiate into cloves. In the garlic community this is called a "round". You can save the rounds and plant them as you would plant a clove, and the following year they will grow larger bulbs. We have experimented with planting bulbils numerous times just out of curiosity, but don't make a practice of it.


Harvesting & storage
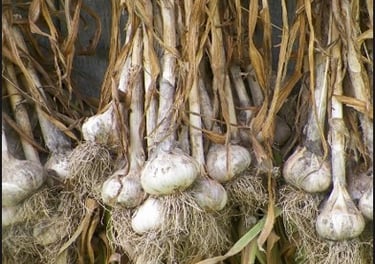
Here in Northwest Pennsylvania, harvest time is in early to mid-July. The leaves on the plant will start to die and turn brown from the bottom up as harvest time approaches. Most garlic plants have 8 or 9 leaves. When the bottom half have died, it is time for harvest. Pull the plants either by hand or using a potato fork to loosen them, depending on your soil conditions. After pulling, move them into the shade as soon as possible. You can shake off most of the soil, but there is no need to remove any part of the wrapper, stem, or roots at this point. The garlic can be hung in bundles or laid on racks or shelving to cure. Curing takes 3-4 weeks. It is important that you cure the garlic in a shady spot where the plants are protected from rain and have good air circulation. If you are uncertain of the adequacy of your air circulation, set up a fan to move the air. You can consume the garlic before it is cured, but you cannot store it long-term unless it is cured. After curing, remove the stems and roots. Cut the stem approximately 1 inch above the bulb, and the roots approximately 1/4 inch below the bulb. Store it in a dry, cool place with good air circulation. Garlic stored in the refrigerator will begin growing sprouts because it interprets the cold as winter and thinks it's time to start growing. Some hardneck varieties will not retain their peak quality and freshness for more than a few months but will still be edible.
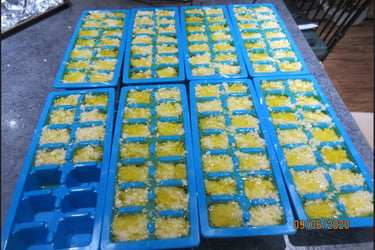
There are a few options for long-term storage. You can dehydrate the sliced or chopped garlic, freeze it, make garlic powder, or put it in vinegar. Infusing oil with fresh garlic for long-term storage is not recommended, due to the possibility of botulism. We freeze a lot of garlic for year-round use. The way we do this is simply to roughly chop the cleaned cloves in a food processor, distribute them in ice cube trays, cover each cube with olive oil, and pop into the freezer. When they are solid, pull them out and let sit on the counter for a few minutes to help loosen the cubes, then remove them and place in an airtight freezer bag or container and return to the freezer. Be sure to chop the cloves before freezing to release the Allicin for the maximum flavor.
After the curing is finished, don't forget to save your "seed" for planting in the fall. ALL the garlic you have harvested is suitable for either planting or eating. You may be tempted to eat the larger bulbs while planting the smaller. Keep in mind that small "seed" will produce small bulbs. Many times over the years we have done experiments where we sorted and planted large and small cloves. The larger cloves always resulted in larger bulbs on average than the small cloves, without exception. We recommend that you set aside the largest bulbs as your planting stock. The rest are for eating. If you consistently save the large cloves from large bulbs year to year, the average size should get larger each year if all other conditions are acceptable. Estimate how many cloves you want to plant for next year. Varieties vary, but most hardnecks will yield an average of about 5 large cloves per bulb for seed. Often times there are some smaller cloves mixed with the large ones. Use them for cooking, not planting.

How to prepare garlic for eating
Peeling the cloves
Chopping, slicing, grating, pressing, etc.....
Cooking methods
Removing the smell from your hands
Peeling the wrappers from cloves can be a time consuming, frustrating task due to its stickiness. Here are some ways we do it:
Break the bulb apart into cloves. Lay the cloves flat on a cutting board. Place the flat side of a knife with a wide blade on top of the garlic and hold the handle tightly with one hand. Making sure that the sharp edge of the blade is facing away from your hand, use the fleshy part of your other hand to press down forcefully on top of the blade. This should break the skin free and you can easily peel it off. Don't smash it TOO hard or your clove will be smashed as well.
Use a silicone tube, which can be purchased at most grocery stores or online.
If you are peeling a large quantity, soak the cloves for a few hours to loosen the wrappers, then peel them.
Place the cloves in a large bowl and place another bowl of the same size upside down on top of the bowl to make a seal. Holding both bowls securely at the edges, shake vigorously for several minutes. Check to see if the skins are separating from the cloves. If not, shake a bit longer.
Similarly, place a few cloves in a jar with a lid and shake until the skins start to break away.
Although you can enjoy the clove cooked whole, you will not experience the full garlic taste unless it is cut or smashed. After prepping your garlic, let it rest for 5-10 minutes at room temperature. This allows an enzyme to mix with oxygen, which converts into allicin, and this is where the flavor and health benefits come from.
The method we use is to simply rub our hands on our stainless steel sink after cutting garlic. You can also rub on a stainless steel utensil. Other people rub their hands with a squeeze of lemon juice or a mixture of salt and baking soda dampened with water.
Garlic can be consumed raw, fried, roasted, dried, etc. Eating it raw will give you the sharpest taste, and roasted will give you the mild and sweetest. When frying, use plenty of butter or oil so that the garlic doesn't stick, and keep it on low heat. One rule you should always follow when cooking it is...DON'T BURN IT, because this makes the garlic taste bitter.
Resources for Regen Ag
(We receive no compensation of any kind for listing these references)
Books:
Regenerative Agriculture and Soil Health
What Your Food Ate: How to Heal Our Land and Reclaim Our Health by
David R. Montgomery and Anne Biklé (Absolutely fascinating book!)
The Living Soil Handbook by Jesse Frost
Lasagna Gardening by Patricia Lanza (No-dig approach ideal for wet or highly compacted soils)
Heavier, but fascinating reading, all three by Jeff Lowenfels and Wayne Lewis:
Teaming With Nutrients
Teaming With Microbes
Teaming With Fungi
Growing Garlic
Growing Great Garlic by Ron Engeland
The Complete Book of Garlic by Ted Jordan Meredith
Websites:
Regenerative Agriculture, cover crops, and soil biology:
www.understandingag.com
There are many more good sources of relevant information.
Garlic Growing Information:
The Complete Guide to Growing Gorgeous Garlic from Seed (greyduckgarlic.com)
You Tube for Regenerative Agriculture (many outstanding presentations!):
John Kempf, Advancing Eco Agriculture
Gabe Brown, Understanding Ag
Steve Groff, Pennsylvania farmer, cover crops
Jim Hoorman, Regen Ag
James White, Rutgers University, Rhyzophagy
One Yard Revolution - Outstanding videos on organic, year-round gardening in cold climates (Chicago, USDA Growing Zone 5) with a small but extremely efficiently managed garden
